How to Make Mantou (Chinese Steamed Buns) with Eleanor
Since I’m still on a bread-making kick, I really wanted to make mantou, or Chinese steamed bread. I love the bread’s QQ (chewy) texture, and its slight sweetness. Eleanor’s mom makes them often, so Eleanor and I decided to try to make some ourselves.
When Eleanor asked her mom for the recipe, her mom’s instant reaction was: It’s really hard. It’s an expected fail. Why don’t I just make some for you guys? Better yet, you can just get them from the grocery store.
To which we responded: … CHALLENGE ACCEPTED.

…how do you think we did?
Ingredients
All-purpose flour: 600g (or about 2.5 cups – measure, then sift)
Sugar: 60 grams (1/4 cup)
Baking Powder: 5 grams (1 teaspoon)
Yeast: 6 grams (1.8 teaspoons)
Butter: 10 grams (scant 1 tablespoon)
Milk: 300 grams (1 cup)
Method
I bloomed the yeast just to check that the yeast was still alive, though the recipe I was following doesn’t call for that. The original recipe just says to layer the ingredients in the order listed further down and then mix in a mixer. I also didn’t have a mixer – a wooden spoon works just fine. 😀
To bloom:
Warm 1/4 cup of milk in microwave (no more than 110 degrees F), add 2 pinches of sugar and the yeast, then let it foam! This usually takes around 10 minutes, and when it’s done blooming, the foam should be the same consistency as what you’d get on a nice, steamy cafe latte.
1. Sift the flour into a large mixing bowl, and create a well in the flour.
2. Add 1/4 cup of sugar and baking powder to the center of the well
3. Add the bloomed yeast to the mixing bowl with the remaining milk. Add the soft butter.
4. Combine it all with a wooden spoon, then knead until smooth. It took me about 20-30 minutes.
5. Grease the mixing bowl and the top of the dough ball, and then cover the ball with saran wrap/clean kitchen towel (so the dough doesn’t stick to anything as it rises).
6. Let the dough rise in a warm spot until doubled in size, which takes about an hour.
7. Punch down the dough, then set it aside to rise again for 20 minutes.
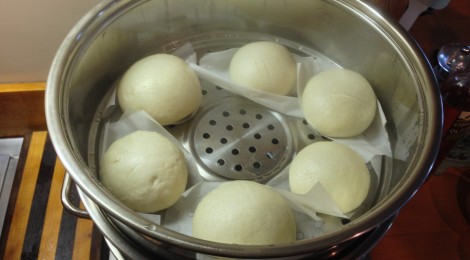
8. Start water boiling in the metal steamer, or any type of steamer you have handy.
9. Form the dough into individual buns. We made about 16 small ones. I formed the dough into little balls by flattening a piece of dough and folding it in on itself, but that ended up interfering with the uniformity of the inside texture a bit. I think rolling the dough into a log and then slicing it into portions would work better.

10. Place each doughball on a square of parchment paper. The buns will expand a bit in the steamer, so make sure to leave some extra room.
11. Fill the bottom layer of the steamer 3/4 full, bring to a boil, then load the top layer of the steamer with the buns. Steam for 12-15 minutes.
12. Remove from steamer with a pair of chopsticks. That is the Asian way.
FAQs:
How do I know there’s enough water/flour?
My mom (and Eleanor’s mom…it must be an ancient Chinese secret) say that you know you have just the right amount of flour/water when the dough doesn’t stick to your hands. By the time you’re done kneading, there should also be no trace amounts of flour left in the mixing bowl – the bowl should be completely clean.
How do I know when I’m done kneading?
I’d always heard that you can tell when you’re done kneading when the consistency of the dough changes – it turns from slightly grainy to extremely smooth, like a baby’s bottom. 😀 Other methods to check include pressing on the dough lightly with your thumb – if the dough bounces back you’re done. The other way, which I like, is to break off a small piece of bread, and then stretch it slowly while holding it up to some light. If the dough stretches to the point where you can see light through it before it breaks, then that means the gluten has developed fully and you’re done kneading.
Where’s the best place to let the dough rise?
My house tends to be pretty cold since the heater isn’t on, so I keep it in an oven with the light on. My mom also says you can preheat the oven to 200 degrees, which is apparently prime proofing temperature.
I’m going to keep playing with the recipe – blooming/not blooming, shaping in different ways – and hopefully find something that works best for me. If you have any suggestions, please weigh in!
Hi,
Thanks for sharing the recipe but I think the measurements are wrong because the flour part 600g and 2.5cups is totally different!!!
2.5Cups isn’t alot but 600g is a lot!!!
Also when I made the dough following only the ingredients in gram, the dough was very dry :S
Should I have added more milk or water?
P’s how do u make it so it looks like the ones in your pics??
I’m sure I did something wrong and I think it might be cause if the ingredients
PLEASE HELP!
Hi,
I’m sorry but I think I got the last bit wrong cause I did all the ingredients in g and only milk in cups.
I think my cup measurements are wrong, I think that even though it has worked in the past, it doesnt with this cause it wouldnt be porpotionate cause i only need a bit of some of the ingredients like tb or tsp
But still, if the dough is too dry do I add milk?
Heyo!
Sorry about late reply – if the dough is too dry, I’d actually say try adding less flour. The first time you knead, add the flour a bit at a time – once you’ve reached the point where the dough stops sticking to your hands/the bowl, stop adding flour. It’s okay if you don’t use all of the flour in the recipe.
Also, if you are kneading and you think you’ve added enough flour but aren’t sure, let the dough rest for a few minutes and then go back to kneading it again – if you find it’s too sticky then add some more flour.
I used this gram to cup conversion tool, so the measurement seems right…http://calculator-converter.com/converter_g_to_c_grams_to_cups_calculator.php
To shape the buns round, like in the picture, I basically shaped it the way you would shape a french bread roll. Here’s a video of that: http://www.finecooking.com/videos/shape-french-bread-rolls-pinch.aspx
I do remember the dough being a bit stiff when I made these – I’ll make some more over the weekend and report back. 😀 Let me know what works for you and what doesn’t!
Thanks!!
Lucia
Thank you So much for a detailed reply.
I think it the cup measurements cause I just found out that my two cups are different sizes : S
Have you tried the frozen mantau? I’ve tried this recipe twice but flavour and texture just can’t meet the frozen commercial type. What are we missing from theirs?